Showing posts with label How do they do that. Show all posts

Monday, September 15, 2014

Guitar Cake–How I did it!

guitarcake1

This past weekend was our friends, Gary and Olivia’s wedding.  They asked if I would make some cookies and a cake for the rehearsal dinner and of course I said yes, it would be my honour.  Gary didn’t want anything grooms-y but Olivia had a different idea.  She emailed me without Gary knowing and asked it I would make a guitar cake.  I’ve never done a sculpted cake before; so the challenge was thrown.  I went to Google and searched guitar cakes and most of them were great, however, very few were lifelike or life size.  Then whilst on Facebook one day, I saw a post by Jessicakesblog.com about a blog she did on how she made a stand up electric guitar.  I didn’t follow her directions completely, since I was going acoustic, but it did use a lot of her tips and loved that she went realistic.

This is the first sculpted cake I’ve ever made but to be honest, it was pretty simple in the carving department.  It was all the finicky details and making the fondant cover the cake right that made my heart beat a little faster.

guitar

So I started with getting an acoustic guitar template off the internet.  I then used my KopyKake lying on it’s side and projected the template onto the MDF board against the wall.  I played with it a lot to get it to look life size.  Then I just outlined the guitar. 

This is where my hubby stepped in with his mad carpentry skills.  He cut out the guitar body and neck separately.  It couldn’t be one piece since it wouldn’t fit in the fridge, so I made it two pieces.  Then he cut out the thicker board for the base, pieced together the angled piece that connects the neck to the body and then some final pieces to help elevate the guitar so it looks like it’s floating.  He edged everything to make it look polished and then spray painted it all dark brown.

structure

Back in the kitchen, I baked to half sheet cakes and popped them into the freezer.  I covered both the body and neck pieces with aluminum foil.  As per Jessica’s advice, I used two sided take to put it in place. I then took the body board and traced it out on parchment and cut it out a 1/2 inch smaller.  Then I placed it on to the partially frozen cakes and cut them out.

photo 1

IMG_3862

The one thing Jessica emphatically stated was that chocolate ganache was the way to go, so that’s where I went.  Five pounds of it actually ;)  Once all was ganached, into the fridge overnight.  It weighed a ton, ok may 10lbs with the board, cake and ganache.

IMG_3873

Next up was to cover in fondant. After procrasti-cleaning the downstairs, I rolled out a huge piece of white fondant.  Then I prayed to the fondant gods and onto the cake it went.  To my absolute amazement, it went on beautifully.  Yay me :)  I put it back into the fridge so it would completely firm up.

IMG_3893

I had planned to just airbrush the colour on but instead decided to paint the wood grain onto the top of the guitar body.  I used Americolor chocolate brown and Americolor Yellow with vodka.  I had to play with how much of each before I got the right colour.  I used an extra piece of rolled out fondant and brushed each try until I got it right.  I also used a wide brush which I think really helped give it that wood grain look.

IMG_3896

When the top was painted I just used the chocolate brown with vodka and painted the sides.  It didn’t come out dark enough so I pulled out the airbrush and redid the sides with the Americolor airbrush brown.  It was starting to look like a guitar.

I then moved on to the neck of the guitar.  I didn’t want to use cake, so I made Rice Krispie Treats (RKT) and cut them into the shape of the neck.  I covered with chocolate ganached and then covered with dark brown fondant (which I coloured myself).  I also airbrushed it with the dark brown to match the guitar body.  Once finished I thought I should see if it all fit together.  Initially I didn’t think it did, but then I just pushed it a bit and it fit perfectly.

IMG_3899

Now for the details.  I used the dark brown fondant and made the large circle and small piece where the strings attach and airbrushed them black.  All of the neck pieces are edible as well.  I used my new clay extruder to make all the note marks and the strings.  I love this new toy so much because I no longer have to hurt my hands to create strings or boarders anymore since it has a crank handle.  Genius. 
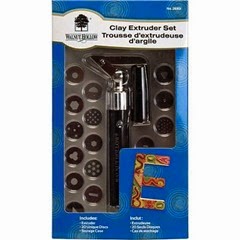
clayextruder

The note marks and string holders are grey fondant painted with silver luster dust and vodka, and the strings themselves are ivory coloured fondant.  I used spaghetti to attach the pieces to the neck head.  I also added “bumper stickers” of all the places Gary has lived as well as his love for the Oregan State Beavers.

IMG_3906

The last thing added was the small plaque we had engraved with Gary and Olivia’s names and wedding date.  I attached it to the board with fondant so they could pop it off and have it as a keep sake.

IMG_3919

So there you go.  That’s how I made it.

This is what it looked like to travel the hour and half away.

IMG_3922

And this is the guitar at the rehearsal dinner.

guitarcake

I had a ton of fun making this cake despite the stress of it being my first carved cake.  Everyone loved it and as you can tell by this next picture, it tasted pretty good too.  Even the RKT neck got eaten :)

IMG_3933

On to the next cake…actually cookies :)

Thanks for looking!

Friday, March 7, 2014

Once Upon A Time…

window

If you live in the world of cookies as I do, then you may know that in three weeks CookieCon 2014 is a coming!  It’s a conference for cookie decorators where we all get together in Salt Lake City and talk cookies.  Ladies and a couple of men come from all over the world for the four days and have a ton of fun, learn a little something and yes, eat cookies.  This will be the second edition of CookieCon and it’ll be bigger and better than the first.

Now just like every conference there is a trade show, key note speakers and goodie bags, however, unlike a regular conference there is also a sugar show.  It’s where those who come to the conference can show off their mad skills.  Two years ago I was only a year or so into my cookie adventure and even though I knew I wouldn’t even come close to winning, I brought a few cookies.  These actually:

cookieconsugarshow

Now fast forward a year and half and it’s time to create an entry for this year’s show.  The categories are:

  • Spring: It’s that time of year - flowers are blooming!
  • Once Upon a Time: Let fairy tales, fables, and stories inspire.
  • Home Sweet Home: Where are you from? Represent your hometown, state, or country. What makes your home special?
  • Anything Goes: Let your imagination run wild! (Must be G or PG rated!)
  • Mystery Shape: The shape will be unveiled and decorated at CookieCon!

I had no idea which one I was going to do until I was watching Beauty and The Beast with my girls last week.  As the movie concluded the final stained glass window appeared and I knew then and there that that was my entry.  Now to figure out how to do it.

I turned to my guru of detailed cookies, Mallory of Butterwinks.  It was time to try something out of my comfort range. I posted my idea and Mallory’s encouragement gave me strength to do it.

I rolled and cut my 10” x 6” cookie, then baked it off.  I printed off the window and then sketched it out using my Kopycake overhead projector.  I got some details but left most of the blocks blank.  This took about 40 minutes.

IMG_2424

Time to mix the colours. CRAP, so so so so many. UGH, I hate mixing colours, who’s with me???? Maybe if I painted it I’d get better colours and I wouldn’t have to spend hours mixing and mixing and mixing.  Sold!  I used white royal icing and filled it the sections.  I wanted the cookie to have dimension and also thought it would be easier to paint if I sectioned it off.  I was right by the way :)  This took a little over an hour to do. I then let it dry overnight.

IMG_2428

Next morning I started to paint.  I used Americolor gels with vodka.  I picked a colour, put a drop on a plate and then used a little vodka to thin for paint and painted.  By mixing the colours this way I could control the intensity and the shades.  This is where I had the most fun.  It took about an hour and a half to do. I’m sure you can do it faster but since painting doesn’t come naturally, I took my time.

IMG_2430

Last up was to mix up black piping icing. You want it thick so it holds up but not so thick your hand falls off when piping.  I used a PME 1.0 tip and almost immediately it clogged and I even ran the icing through a sieve prior to putting into the piping bag.  You all know what I mean.  Now I had heard of putting the icing into a pair of nylons and squishing it through but since it was already in the bag it was an extra step this lazy girl didn’t want to take.  I had one pair and yes they were used but they were clean.  DON’T FREAK OUT, THIS COOKIE WAS NEVER GOING TO BE EATEN.  Always use new/unused nylons for this please.  I cut out a square and placed it over the coupler and then secured the tip.  It was brilliant, never clogged again! The beer in the corner was for when I finished :)

IMG_2432

Then with the original window blown up on my iPhone next to me,  I piped out the black lines.  This felt like it took all day but probably took an hour and a half.  My back was an unhappy camper after all this bending.  I spent the rest of the day on the floor :(

But it was so worth it because after it dried it looked like this:

windowcookiefinal

Now next to the original window:

windowvscookie

And then the best thing happened.  I posted it to my FB page and my world blew up.  In the next 24 hours it was viewed over 25,000 times, reposted 60 times and the comments made me smile from ear to ear so hard my cheeks hurt.

THANK YOU THANK YOU THANK YOU!!!!  I made this cookie to see if I could and all this amazing love towards it proved to me that I should continue doing what I do.

Now to get it to CookieCon to show it off in person.  I don’t care if it wins anything at this point because due to all of your love, I already won!

So if you are wondering if you should bring a cookie to the show, do it do it do it.  We all have to start somewhere and it’s not everyday that you’ll be in a room with such amazing people who will support everything you do in the world of cookies! I love my family but they don’t get it, especially when you tell them they can’t eat it before it’s had it’s picture taken.  (you know what I mean, hehehe)

Thanks for looking!

Friday, August 2, 2013

How Do They Do That???? Guest Post by Butterwinks!


Hi! I'm Mallory!

HI
You might know me as one half of ButterWinks!

I've been asked by the lovely Karen to bring you into my creative process and answer some of your questions along the way. I decided to create something nice n' big just for the occasion so I could make sure to let you guys see every little step from beginning to end. That being said..  grab your favorite patterned snuggie (because I know you have one) and a cup of coffee and enjoy the ride!

1
When I decide to do a big piece like the Alice in Wonderland I make sure the artwork itself chooses the shape of the cookie- not me. I always want the shape of the cookie to be as true to what I'm doing as possible.

On a day-to-day basis, yes, we do hand cut most every single cookie that leaves the kitchen and the process is just like pictured above, but that's not to say we don't abuse the bejesus out of our plaque and circle cutters. I draw every character or design on a piece of paper beforehand and pass it off to my mom for her to cut. Every cookie is special and it all depends on the design.

4
Typically we bake our butter cookies at 400* for 8-10 minutes, but for the big ones I like to bake them at 350*-375* for 15-18 minutes. Once it's nice and cool I sketch out my design straight to the cookie using my beloved edible markers. I do not use a projector, ever! I can't answer this question enough. Everything I do is completely freehand.

I feel like I need to publicly say again that I found cookie decorating separate from the wonderful cookie community I'm slowly getting to know (and love!). I am completely self-taught via many, many failed experimentations with technique and many, many a horrid cookie. I have only recently, after almost two years of decorating cookies, come into a nice, solid technique I feel comfortable repeating with every cookie project I set out to do.

A LOT of questions I get on a frequent basis are about my royal icing. There are some things I've been asked that I've never even thought to do, take note of, or experiment with as far as icing goes. We do not count our icing and we do not let our colors sit overnight. We prepare our icing to a nice desired consistency for flooding/filling and adjust it per color from there depending on what I'm going to be using said color for. Typically with every batch of colors we make there is one smaller bag of thicker black made for outlining.

5
I've found that bleeding isn't an issue when you lay your colors together fast enough. There is only a few-second window of opportunity (that I've noticed) to put colors together without immense risk of bleeding. The Alice in Wonderland design wasn't as prone to wet-on-wet as much as I would have liked it to be, so I did my colors in two separate sittings (as opposed to my usual one) and throughout the day every so often in between.

Not only with decorating but also with painting and drawing I tend to hop around to random parts of the piece to start, leave alone, come back and attack. So, if the filling seems sporadic... well, it completely is.

6
I was recently asked how I prevent air bubbles from rising overnight and how I prevent my white from bleeding. I honestly cannot answer these questions because I've never had these problems. If you're experiencing air bubbles I believe you might be whipping your icing at too high of a speed, incorporating air pockets into the icing itself. If your white is bleeding you might not be laying it next to your other colors fast enough or waiting long enough for the colors next to it to fully dry.

7
Once I have all of my colors down I'll let the cookie sit on wax paper overnight and outline in the morning. Like I mentioned before I like outlining with a thicker consistency icing and I use a Wilton 1 tip.


final
And.. voila! That's my process!

I was also recently asked if I make mistakes.... OF COURSE I MAKE MISTAKES! Lol! I can't stress this enough! This piece alone is littered with mistakes that makes my skin crawl! I try to hide them as I go and I try not to point them out because, at the end of the day, we all must realize we are our own worst critics and it is, indeed, JUST A COOKIE! It WILL be eaten, and it WILL be delicious!

As long as you learn from your mistakes, and apply what you learned the next time around, you will constantly get better. Your work will become more precise and you will become more confident in what you're doing. And that is called growth as an artist, my friends!

I, myself, have a long way to go! And I can't wait to keep creating. I hope you enjoyed a little in-depth look into my cookie-making adventure and had some questions answered along the way.
Keep it sweet!

xoxo
Mallory Mae :)


*************************
I know, I just fell in love too!  Isn’t she amazing.  I’ll take one-one hundredth of Mallory’s talent thank you very much.  Check out her FB page https://www.facebook.com/ButterWinks

Thank you Mallory for coming to visit and telling us how you do what you do.  I feel pretty good leaving my blog in your capable hands with this post.  Just awesome and I can definitely tell you there will be more posts from your favourites in the future! 

Thanks for looking!