Showing posts with label Tutorial. Show all posts

Tuesday, September 9, 2014

Shoes and Bowtie Buttercream Cake–Tutorials included.

shoesandbowtiescake

My friend Mark asked if I would make a birthday cake for two and make it girly.  The other requirement was chocolate and that yellow be incorporated.  Okey dokey. 

I wanted to try the large bow that crushed my spirit after the last cake I made (it broke when I put it on the cake).  This time I used Lesley’s of Royal Bakery’s tutorial on how she makes her bows and victory!  It didn’t break and looks actually like a bow.  Yay me!

I also tried Laura’s of Krazy Kool Cakes tried and true how to get the buttercream flat and crisp edges.  I’m 90% there and feeling groovy.

I would recommend both theses tutorials. They are fabulous.

shoesandbowtiescakecloseup

shoesandbowtiescaketopper

shoesandbowtiescaketoptier

Finally I made those tiny shoes out of fondant.  I used Cakes by Lynz’s how to make mini gumpaste shoes.  You can find it here.  The template is available in Lynsey’s tutorial.

I hope these tutorials help in your attempts in the world of cakes and I hope you enjoyed my creation!

Thanks for looking!

Sunday, September 7, 2014

Teddy Bear Cookie Tutorial

babyboyshowerset1

I was recently asked by a friend if I would make some cookies for an upcoming baby shower.  Of course I said yes.  I had free reign with colours and design, so I had a lot of fun.

I made your pretty standard onsies, rocking horses, rattles, carriages and teddy bears.  It was the teddy bear that I thought I’d give a try writing out a tutorial.  I hope it helps.

What you need:

  • brown flood icing
  • grey detail icing (just a bit thicker)
  • PME Tip #2
  • PME Tip #1.5
  • Black edible ink marker (I used Rainbow dust)
  • Brown edible ink marker

Step 1: Outline the bear head.

step01

Step 2: Fill in head.

step02

Step 3: Outline and flood paws.

step3

Step 4: Flood body and ears.

step04

Step 5: Add arms

step05

Step 6: Add great ear and paw details.

step06

Step 7: Add small circle on face for nose.

step07

Step 8: Use black edible market to add eyes, nose, mouth and paw marks. Use brown edible market and draw a line down centre of bear.  I used a wet brush to smudge line to give a softer look.  Add a dap of white to the eyes. Finally add scarf. 

step08

Super simple and super cute!  This little guy makes a great addition to any baby set.

babyboyshowerset2

I also added little bears to the onsies to bring the set all together :)

onsies

Thanks for looking!

Friday, March 7, 2014

Once Upon A Time…

window

If you live in the world of cookies as I do, then you may know that in three weeks CookieCon 2014 is a coming!  It’s a conference for cookie decorators where we all get together in Salt Lake City and talk cookies.  Ladies and a couple of men come from all over the world for the four days and have a ton of fun, learn a little something and yes, eat cookies.  This will be the second edition of CookieCon and it’ll be bigger and better than the first.

Now just like every conference there is a trade show, key note speakers and goodie bags, however, unlike a regular conference there is also a sugar show.  It’s where those who come to the conference can show off their mad skills.  Two years ago I was only a year or so into my cookie adventure and even though I knew I wouldn’t even come close to winning, I brought a few cookies.  These actually:
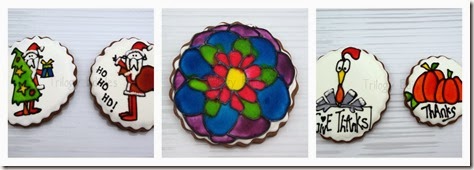
cookieconsugarshow

Now fast forward a year and half and it’s time to create an entry for this year’s show.  The categories are:

  • Spring: It’s that time of year - flowers are blooming!
  • Once Upon a Time: Let fairy tales, fables, and stories inspire.
  • Home Sweet Home: Where are you from? Represent your hometown, state, or country. What makes your home special?
  • Anything Goes: Let your imagination run wild! (Must be G or PG rated!)
  • Mystery Shape: The shape will be unveiled and decorated at CookieCon!

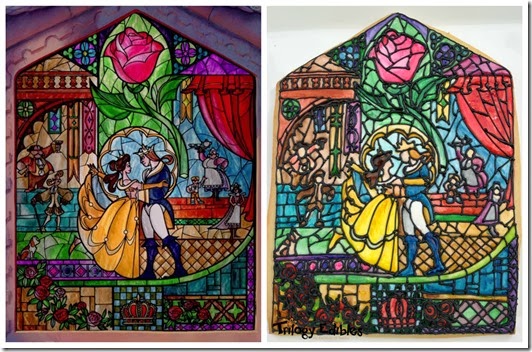
I had no idea which one I was going to do until I was watching Beauty and The Beast with my girls last week.  As the movie concluded the final stained glass window appeared and I knew then and there that that was my entry.  Now to figure out how to do it.

I turned to my guru of detailed cookies, Mallory of Butterwinks.  It was time to try something out of my comfort range. I posted my idea and Mallory’s encouragement gave me strength to do it.

I rolled and cut my 10” x 6” cookie, then baked it off.  I printed off the window and then sketched it out using my Kopycake overhead projector.  I got some details but left most of the blocks blank.  This took about 40 minutes.
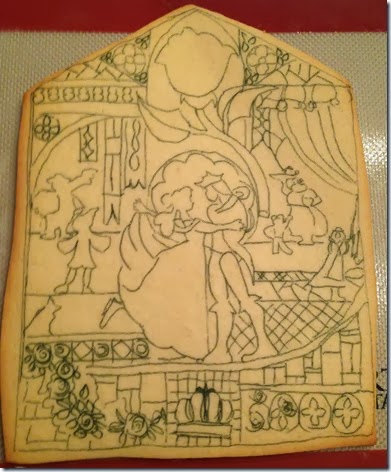
IMG_2424

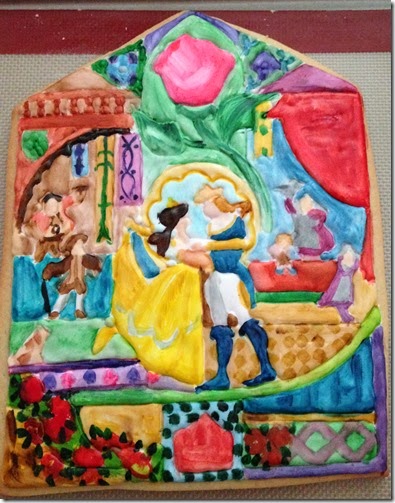
Time to mix the colours. CRAP, so so so so many. UGH, I hate mixing colours, who’s with me???? Maybe if I painted it I’d get better colours and I wouldn’t have to spend hours mixing and mixing and mixing.  Sold!  I used white royal icing and filled it the sections.  I wanted the cookie to have dimension and also thought it would be easier to paint if I sectioned it off.  I was right by the way :)  This took a little over an hour to do. I then let it dry overnight.
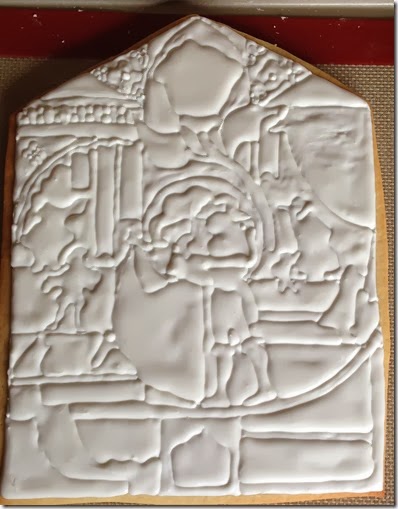
IMG_2428

Next morning I started to paint.  I used Americolor gels with vodka.  I picked a colour, put a drop on a plate and then used a little vodka to thin for paint and painted.  By mixing the colours this way I could control the intensity and the shades.  This is where I had the most fun.  It took about an hour and a half to do. I’m sure you can do it faster but since painting doesn’t come naturally, I took my time.
IMG_2430

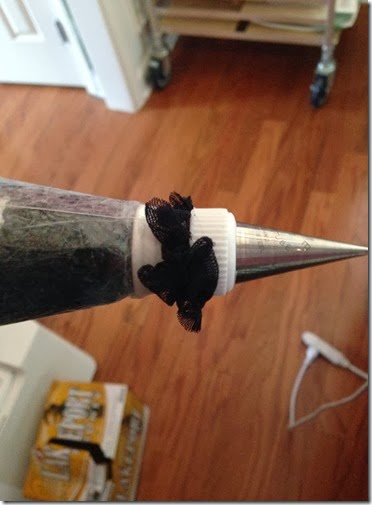
Last up was to mix up black piping icing. You want it thick so it holds up but not so thick your hand falls off when piping.  I used a PME 1.0 tip and almost immediately it clogged and I even ran the icing through a sieve prior to putting into the piping bag.  You all know what I mean.  Now I had heard of putting the icing into a pair of nylons and squishing it through but since it was already in the bag it was an extra step this lazy girl didn’t want to take.  I had one pair and yes they were used but they were clean.  DON’T FREAK OUT, THIS COOKIE WAS NEVER GOING TO BE EATEN.  Always use new/unused nylons for this please.  I cut out a square and placed it over the coupler and then secured the tip.  It was brilliant, never clogged again! The beer in the corner was for when I finished :)
IMG_2432

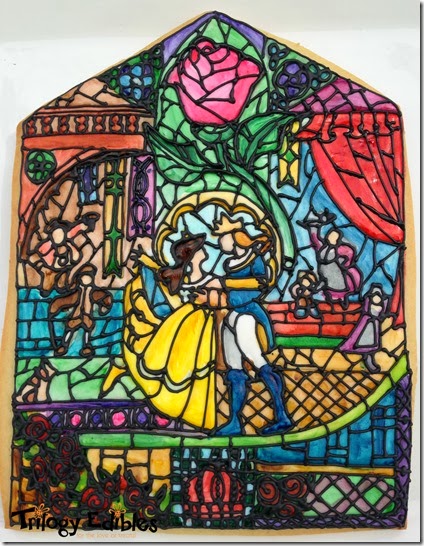
Then with the original window blown up on my iPhone next to me,  I piped out the black lines.  This felt like it took all day but probably took an hour and a half.  My back was an unhappy camper after all this bending.  I spent the rest of the day on the floor :(

But it was so worth it because after it dried it looked like this:
windowcookiefinal

Now next to the original window:

windowvscookie

And then the best thing happened.  I posted it to my FB page and my world blew up.  In the next 24 hours it was viewed over 25,000 times, reposted 60 times and the comments made me smile from ear to ear so hard my cheeks hurt.

THANK YOU THANK YOU THANK YOU!!!!  I made this cookie to see if I could and all this amazing love towards it proved to me that I should continue doing what I do.

Now to get it to CookieCon to show it off in person.  I don’t care if it wins anything at this point because due to all of your love, I already won!

So if you are wondering if you should bring a cookie to the show, do it do it do it.  We all have to start somewhere and it’s not everyday that you’ll be in a room with such amazing people who will support everything you do in the world of cookies! I love my family but they don’t get it, especially when you tell them they can’t eat it before it’s had it’s picture taken.  (you know what I mean, hehehe)

Thanks for looking!

Friday, February 7, 2014

Royal Icing–My Do’s & Do Not’s

royalicingcoverb

I get asked a lot what recipe I use for my royal icing.  Well, it’s not a secret.  I use Bridget’s from Bake at 350’s recipe.  At least that’s where I start.  I love it, it works for me. But I do have issues; my Kitchenaid mixer is over 15 years old.  It’s an original professional series that they made for home use and the bowl isn’t completely round at the bottom.  There’s a bump at the bottom and sometimes not all things get incorporated which is bad for royal icing.

So here’s what I do! Just in case there are other’s out there with the “older” mixer in their lives.

Recipe First: all thanks to Bridget!

  • 4 tbsp meringue powder
  • 1/2 cup water
  • 1 lb of icing/powdered sugar
  • 2 tsp lemon juice (This is for flavour but the juice will also keep the icing from becoming so hard you break your teeth.  Don’t worry, the icing will stand up to packaging to shipping)
  • 2 tsp clear corn syrup

IMG_2245

  1. In the bowl of your mixer, add the meringue powder and water.  I use Wilton.  I know you either love or hate it, but I’ve never had any issues so that’s what I use.  But feel free to use what ever brand you want.

    IMG_2233
  2. Take a whisk and completely mix together.  My issue is that the little hump in the middle of my bowl doesn’t allow the mixer whisk to completely mix together.

    IMG_2236
  3. Then put the bowl on a scale and add 1lb of the powdered sugar.  Whisk again by hand and once incorporated, put onto the mixer with whisk attachment on number two.

    step3
  4. Add lemon juice and syrup and whisk for up to 10 minutes.  You can always turn the mixer up but by keeping it on the lower speed, any of the sugar that’s too big will have time to dissolve and you shouldn’t get any clogging issues (Thanks Arty McGoo for that tip!)
    IMG_2249
    Don’t over whip your icing, it will also ruin your icing.  It will seem fine while piping but will dry looking cratered and grainy.

    craters
  5. When the icing can stand up it’s done!
  6. It can be stored in an airtight container on the counter for 3-4 days or in the fridge up to two weeks.  It will separate, just stir it up and add a teaspoon of icing/powdered sugar to reactivate before colouring.

Now when it comes to decorating cookies, I tend to use one consistency for outlining and filling and then another for detailing.  I can’t tell you if it’s 10 second icing or 20 second icing.  I just know that as I add water one drop at a time to thin down the icing to fill a cookie and then the icing comes off my spoon in a ribbon and soon loses all it’s shape, then it’s done.  For piping, I just use the stuff right out of the bowl.  With colour it loosens up a bit but not too much.  Just experiment and see what works for you.

vintagebatman

It’s not much, but that’s it!!!  Royal Icing doesn’t have to be daunting.  Your first batch may not be perfect  but then neither was mine!  Mum was right, practice makes perfect!

Thanks for looking!

Sunday, September 22, 2013

Tennis Balls–making them look real!

step8

I was asked to make tennis balls for an order for the bakery and I could have totally made them pretty simple/flat, but after watching SweetAmbs’ tutorial on making a fuzzy teddy bear I knew what I needed to do!

As a tennis player, I felt the need to make these look pretty real. Here’s how I did it!

What you’ll need:

  • circle cutter
  • yellow flooding icing
  • white piping icing
  • Size 1.5 PME tip
  • Size 4 PME tip
  • Food ready paint brush

1.  Make, cut and bake circle cookies.  Outline each circle in yellow icing and then use white icing add the seam of the tennis ball.

step2

2.  Fill in the tennis ball in yellow.

IMG_1119

3.  Let dry overnight or in front of a fan for a couple hours until completely dry.  Using a paintbrush and dab yellow icing all over the yellow flat of the cookie. The more you dab the more you get a fuzzy look.

step5a

4.  Let dry and go over the white seam with another layer of white.

IMG_1132

5. Add you embellishments if needed.

step6

I love the way these turned out.  My hubby wasn’t so sure about the fuzzy but once they dried they were exactly what I wanted.  So I guess what I’m saying is that a flat tennis ball cookie is fine, but to make it a little more real, fuzzy is the way to go!

step7

Thanks for looking!

Friday, October 5, 2012

A post with no name or reason! or Banana bread two ways with a Peony Tutorial!

bananabread

I had a few bananas start to turn towards the dark side so I thought I’d try a few different recipes.  First one is banana pumpkin and the second is banana chocolate chip.  I know, not terribly off the charts exciting, so I also decided to play with gum paste flowers again!

The breads were delicious and the recipe will follow, I promise.  However, today I thought I’d show you how I made my peonies.  It’s way easier than you think!

IMGP0842

So here we go:

You will need some gum paste coloured, peony cutter, ball and veining tool, ziploc bag, rice krispie treats, roller, forming mat and some shortening.

IMGP0857

1. Roll the RKT’s into a 1” to 1 1/2” size ball.  I like to coat it with shortening to help the gum paste stick.

IMGP0862

2.  Roll out some gum paste as thin as you can get it without ripping.  I like to rub shortening into my work surface to prevent the gum paste from sticking.  You can see the sheen :)

IMGP0858

3. Cut out your petals. If you don’t have this cutter, you can also use a non-fluted 5-petal cutter.  Place the cut flower into a ziploc bag that you’ve slit down two sides so it opens like a book.  You can close it up so you can cut out more than one flower at a time.

IMGP0859

4.  Now, I’ve tried both ways. You can either take the petals out to form/thin, or I like to keep them in the bag.  With the ball tool, push away from centre to elongate the petals.

IMGP0860

5.  Take a small brush and brush water to outsides of petals.  This will help the gum paste stick to each other.  If you have too much water on the brush, just wipe with paper towel and your gum paste will get sticky.

IMGP0863

6. Place RKT ball in centre of petals.  Fold two leaves over centre.

IMGP0864

7. Use the vein tool to give the remaining three petals some texture.Wrap remaining petals around the ball and overlap the petals making sure you cover the seams.

IMGP0866

IMGP0867

8.  Take another 5-petal and continue to wrap all 5 petals. 

IMGP0870

9.  You can keep adding until you get your desired size.  Make the petals tighter or looser.  It’s all about your favourite look.  Here are the orange ones with 3 layers.  They aren’t perfect but what flower is?

IMGP0890

10.  You can also make the open look peony as well.  I just dried them in a small bowl lined with aluminum foil.  Dry them for at least 2-3 days because if they are still still soft, they will break so easy.  Always make a couple extras!

openpeony

They didn’t quite dry before the cake was eaten :)  But they did turn out great!  As promised here is the bread recipe.  It was delish.  Rob took the cakes into work and said they didn’t last through lunch.

Banana Bread Recipe:

  • 2 cups all-purpose flour
  • 3/4 teaspoon baking soda
  • 1/2 teaspoon salt
  • 1 cup sugar
  • 1/4 cup pumpkin puree (1/4 cup butter)
  • 2 large eggs
  • 1 1/2 cups mashed ripe banana (about 3 bananas)
  • 1/3 cup plain low-fat yogurt
  • 1 teaspoon vanilla extract
  • 1 1/2 cup chocolate chips (optional)
  1. Mix pumpkin, eggs, sugar, vanilla and yogurt. 
  2. Add in bananas
  3. Add in dry ingredients.
  4. Mix until combined.
  5. Bake at 350 until toothpick comes clean.
  6. Enjoy!

I iced it with some leftover vanilla bean butter cream and used this awesome technique from Melissa at MyCakeSchool.com 

IMGP0843

Thanks for looking!