Showing posts with label chocolate. Show all posts

Wednesday, October 29, 2014

Treat Day Wednesday–Halloween Treats!

Ok, so I’ve been a little remiss on sharing my treats over the past couple weeks but rest assured I did make them.

So here we go:

Witches Cupcakes:  Here I made simple chocolate cupcakes, covered with black chocolate icing and topped with an airbrushed sugar ice cream cone.  I also added the fondant details.  If you don’t want black lips, tongues and mouths then I’d suggest a different colour for the hair/icing.

witchhats

Spookie Cookies:  Left over cookies, icing and some wet on wet techniques!  Super simple, super fun and super tasty.  The black icing is chocolate royal icing with a bit of black gel colouring.  It’ll still colour your mouth but won’t have a bitter taste because it tastes like chocolate!

sillyghosts


My Chocolate Royal Icing: Take a cup of already made royal icing, add 2 tbsp of cocoa and mix together.  It will be quite thick.  Add 2-3 drops of black gel colouring and completely combine.  It won’t be so dark but let it sit for an hour and it’ll be jet black.  You also won’t require to add water to loosen it up as it will do that too.  This is just what I did, you may need to play with your icing to get the right consistency.

So give it a go.  It’s nice not to have aweful tasting black icing for a change.  I hope it works for you too!

Thanks for looking!

Tuesday, October 21, 2014

Magic Cookies and Mustaches–Not what you think :)

A friend asked if I’d make cookies for her nephew who was having a magic themed birthday.  The only request was they not be babyish.  He was six not a baby!

I scoured the internet for magic themed ideas but they were either very babyish or too scary, so I incorporated a little bit of both!

magiccookieset

I had fun with stamping, painting and stenciling!

Next up was for our babysitter and all around awesome person, Alyssa.  She asked if I’d do her dad’s 60th birthday cake and cookies.  Chevrons and mustaches.  Cute!

They sent me the invite and I tried to do them justice.

IMG_4235

First the cookies:

mustachecookies

Next the cake:

mustachecake

Creating this cake became a comedy of errors.  We had our house up for sale and hadn’t had a showing in two weeks.  So, of course, we got one the day I was decorating the cake.  I had just finished ganache-ing this chocolate cherry cake when the text message came in giving me an hour and fifteen to get the house show ready.  So into the fridge it went.  I got the house ready, took the dogs for a walk, came back and pulled the cake back out to ice.  Then of course the door bell rang and the showing was rescheduled but they neglected to let me know.  Cake back into the fridge.  After they left I tried again and another text for another showing came in.  Cake back into the fridge.  The dogs and I are back out of the house, I picked up the girls at school and we went to get some ice cream as a treat.  Another text comes in from the showing people; they need to reschedule until tomorrow.  This was 45 minutes into the showing…are you kidding me?????  In the end I was up late finishing this cake because we now had showings for Saturday and the cake was to be picked up early afternoon.  I had originally wanted to put chevrons but didn’t like the way they looked, so I cut out some mini mustaches and added some dots. I used tappits for the letters. It turned out pretty cute but I wasn’t loving it until I got  this awesome email.

“I just wanted to say thank you for the amazing cake and cookies.  That had to be THE BEST CAKE we have ever had...and it was really beautiful!  The cookies were a big hit too.”

Thank for looking!

Monday, September 15, 2014

Guitar Cake–How I did it!

guitarcake1

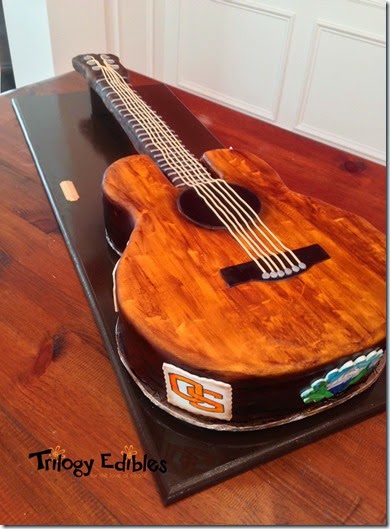
This past weekend was our friends, Gary and Olivia’s wedding.  They asked if I would make some cookies and a cake for the rehearsal dinner and of course I said yes, it would be my honour.  Gary didn’t want anything grooms-y but Olivia had a different idea.  She emailed me without Gary knowing and asked it I would make a guitar cake.  I’ve never done a sculpted cake before; so the challenge was thrown.  I went to Google and searched guitar cakes and most of them were great, however, very few were lifelike or life size.  Then whilst on Facebook one day, I saw a post by Jessicakesblog.com about a blog she did on how she made a stand up electric guitar.  I didn’t follow her directions completely, since I was going acoustic, but it did use a lot of her tips and loved that she went realistic.

This is the first sculpted cake I’ve ever made but to be honest, it was pretty simple in the carving department.  It was all the finicky details and making the fondant cover the cake right that made my heart beat a little faster.
guitar

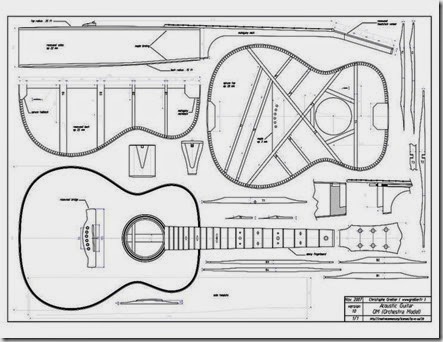
So I started with getting an acoustic guitar template off the internet.  I then used my KopyKake lying on it’s side and projected the template onto the MDF board against the wall.  I played with it a lot to get it to look life size.  Then I just outlined the guitar. 

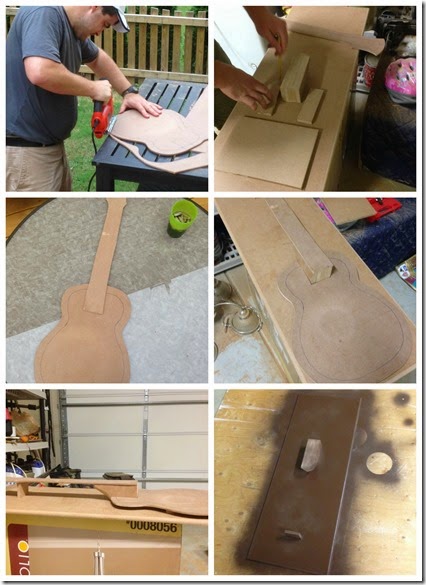
This is where my hubby stepped in with his mad carpentry skills.  He cut out the guitar body and neck separately.  It couldn’t be one piece since it wouldn’t fit in the fridge, so I made it two pieces.  Then he cut out the thicker board for the base, pieced together the angled piece that connects the neck to the body and then some final pieces to help elevate the guitar so it looks like it’s floating.  He edged everything to make it look polished and then spray painted it all dark brown.
structure

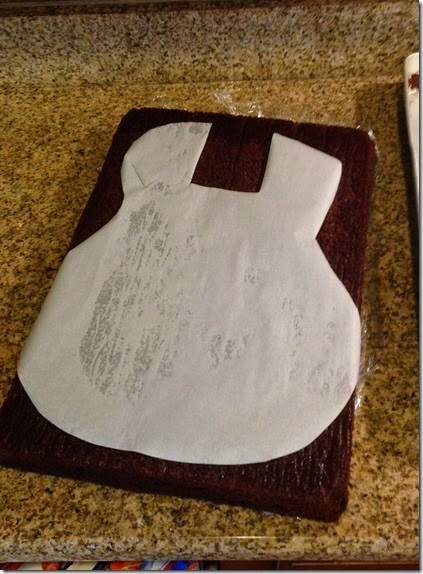
Back in the kitchen, I baked to half sheet cakes and popped them into the freezer.  I covered both the body and neck pieces with aluminum foil.  As per Jessica’s advice, I used two sided take to put it in place. I then took the body board and traced it out on parchment and cut it out a 1/2 inch smaller.  Then I placed it on to the partially frozen cakes and cut them out.
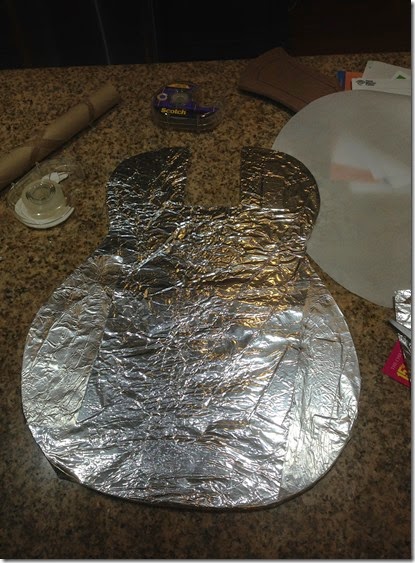
photo 1

IMG_3862

The one thing Jessica emphatically stated was that chocolate ganache was the way to go, so that’s where I went.  Five pounds of it actually ;)  Once all was ganached, into the fridge overnight.  It weighed a ton, ok may 10lbs with the board, cake and ganache.
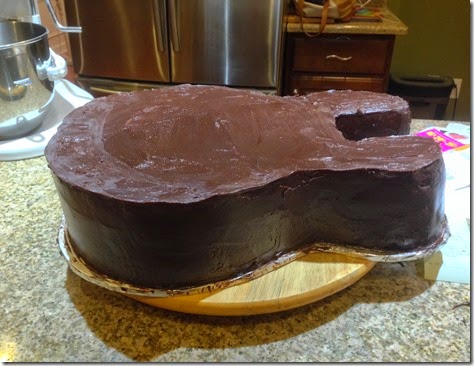
IMG_3873

Next up was to cover in fondant. After procrasti-cleaning the downstairs, I rolled out a huge piece of white fondant.  Then I prayed to the fondant gods and onto the cake it went.  To my absolute amazement, it went on beautifully.  Yay me :)  I put it back into the fridge so it would completely firm up.
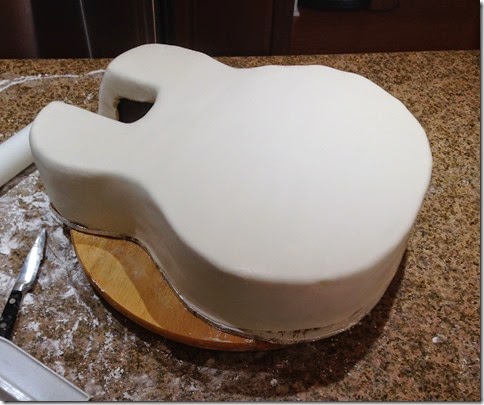
IMG_3893

I had planned to just airbrush the colour on but instead decided to paint the wood grain onto the top of the guitar body.  I used Americolor chocolate brown and Americolor Yellow with vodka.  I had to play with how much of each before I got the right colour.  I used an extra piece of rolled out fondant and brushed each try until I got it right.  I also used a wide brush which I think really helped give it that wood grain look.
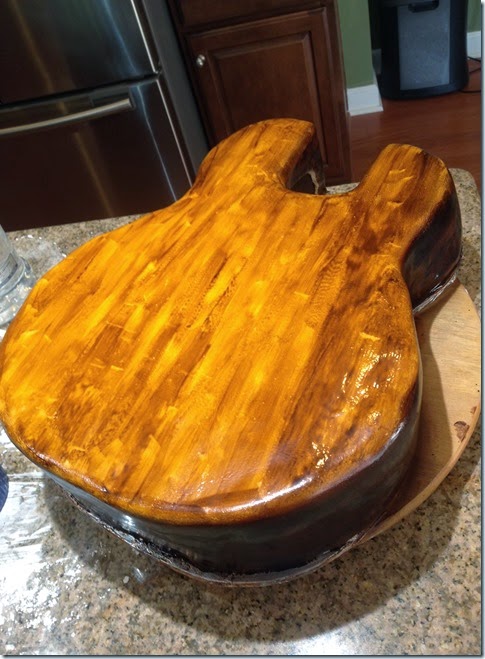
IMG_3896

When the top was painted I just used the chocolate brown with vodka and painted the sides.  It didn’t come out dark enough so I pulled out the airbrush and redid the sides with the Americolor airbrush brown.  It was starting to look like a guitar.

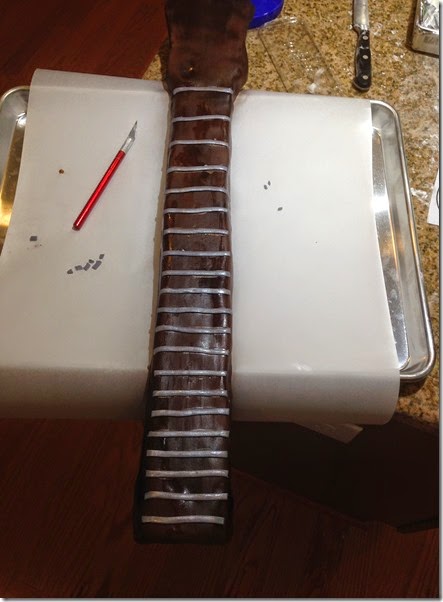
I then moved on to the neck of the guitar.  I didn’t want to use cake, so I made Rice Krispie Treats (RKT) and cut them into the shape of the neck.  I covered with chocolate ganached and then covered with dark brown fondant (which I coloured myself).  I also airbrushed it with the dark brown to match the guitar body.  Once finished I thought I should see if it all fit together.  Initially I didn’t think it did, but then I just pushed it a bit and it fit perfectly.
IMG_3899

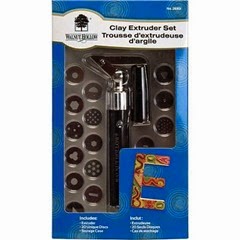
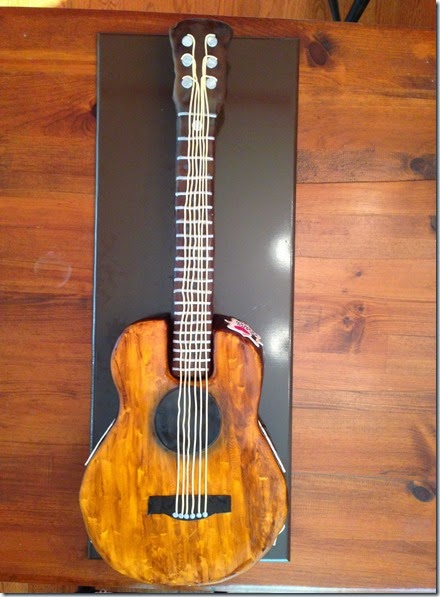
Now for the details.  I used the dark brown fondant and made the large circle and small piece where the strings attach and airbrushed them black.  All of the neck pieces are edible as well.  I used my new clay extruder to make all the note marks and the strings.  I love this new toy so much because I no longer have to hurt my hands to create strings or boarders anymore since it has a crank handle.  Genius. 
clayextruder

The note marks and string holders are grey fondant painted with silver luster dust and vodka, and the strings themselves are ivory coloured fondant.  I used spaghetti to attach the pieces to the neck head.  I also added “bumper stickers” of all the places Gary has lived as well as his love for the Oregan State Beavers.
IMG_3906

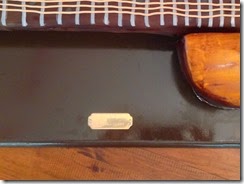
The last thing added was the small plaque we had engraved with Gary and Olivia’s names and wedding date.  I attached it to the board with fondant so they could pop it off and have it as a keep sake.
IMG_3919

So there you go.  That’s how I made it.

This is what it looked like to travel the hour and half away.
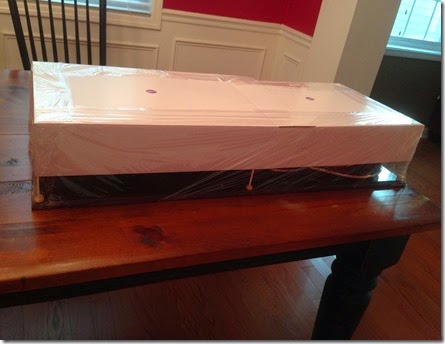
IMG_3922

And this is the guitar at the rehearsal dinner.
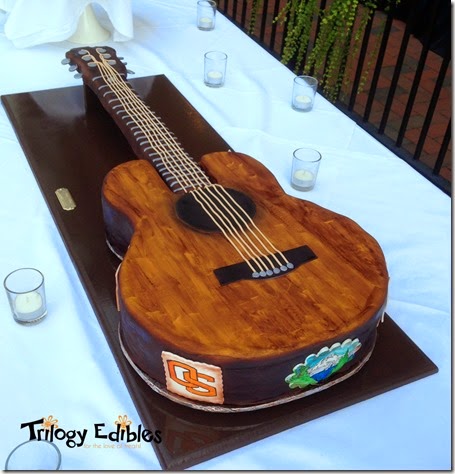
guitarcake

I had a ton of fun making this cake despite the stress of it being my first carved cake.  Everyone loved it and as you can tell by this next picture, it tasted pretty good too.  Even the RKT neck got eaten :)
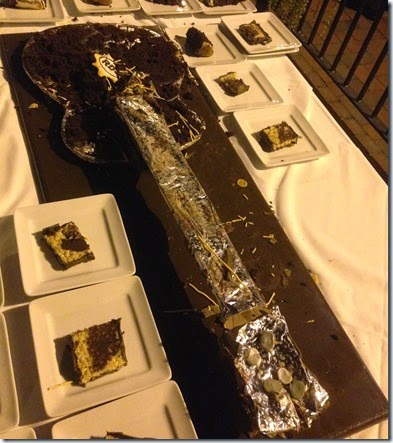
IMG_3933

On to the next cake…actually cookies :)

Thanks for looking!

Wednesday, September 3, 2014

Treat Day Wednesday–Super Simple Easy Peasy Fudge Bars

fudgebarcover

I know I’m shocked too, two weeks in a row for Treat Day. Crazy!

Now it’ll be hard to follow up after last weeks super successful donuts post, but I’ll try.  The next couple of weeks are going to get pretty crazy around here.  Two very dear friends of ours are getting married on different weekend and in different countries.  One is happening in High Point, NC and the other is in Ottawa, Canada and of course I volunteered to make a little something for each :)  When they are done, I’ll be sure to post.

Anyway, I wanted to make sure I continued my Treat Days, but I also wanted to make sure I made something super simple.  I went to Pinterest for some inspiration and I kept seeing all kinds of different bars.  But they also seemed really labour intensive for the amount of time I had put aside to make today’s treat.  Then I went to the pantry and four ingredients caught my eye.  Chocolate chips, peanut butter chips, sweetened condensed milk and nilla wafers.  OOOOOOH I know fudge but then turn it into a bar with the nilla wafers. Yeah baby!

fudgebar1

So here it goes.  Super Simple, Easy Peasy Fudge Bars!

  • 10 oz chocolate chips
  • 1 cup peanut butter chips
  • 1 can sweetened condensed milk
  • 1 box nilla wafers
  • 1 stick melted butter
  1. In the bowl of a food processor, grind wafers.  Add melted butter.
  2. Press into 9” square pan that you lined with parchment paper.  Bake at 350 for 10 minutes.  Set aside.
  3. In a medium sized sauce pan, melt chips and milk together until smooth.
  4. Pour over wafer crust and smooth out.
  5. Drizzle with white chocolate.  Chill for 30 minutes.
  6. Cut into squares and serve.
  7. Enjoy!

See, super easy!

fudgebar

The girls both gave these a thumbs up!  So that’s pretty impressive since they tend not to like the same things ever.

I hope you’ll give these a go because every one loves easy peasy recipes!

Thanks for looking!

Monday, June 9, 2014

Chocolate Salted Caramel and Fresh Strawberry Cupcakes

cupcakes

First off, these should be illegal and that’s saying something from me since I’m not the biggest fan of cupcakes in general.  Don’t hate me but I’d rather eat a cookie or a piece of cake than have a cupcake.  Most cupcakes have too much icing on them.  In my opinion there should always be more cake to icing ratio and in all those fancy cupcake stores, the icing is usually twice as much as needed.  It’s a cupcake not a cupicing.

I digress.

So why did I make cupcakes?  Someone asked me if I would and I said yes.  When I asked what they wanted they asked if I could do a salted caramel and a strawberry.  So there you have it :)

I already had a kick ass chocolate cake recipe and a vanilla cake recipe that I could rework into a strawberry.

First the Chocolate Salted Caramel cupcakes.  These require three things, the cake, the icing and most importantly the caramel.  Now you could make your own if you have the gift.  I don’t so I use the salted caramel sauce from Trader Joes.  You can eat this right out of the jar if you were so inclined. I was ;) 

I then needed a really luscious icing recipe.  I thought a cream cheese icing might work really well with the salted caramel.  The icing should always balance out the cake not over power it.

saltedcaramel

Chocolate Cake:

  • 1 3/4 cup flour
  • 2 cups sugar
  • 3/4 cup cocoa
  • 2 tsp baking soda
  • 1 tsp baking powder
  • 1 tsp salt
  • 1 cup buttermilk
  • 1/2 cup vegetable oil
  • 2 large eggs
  • 1 tsp vanilla
  • 1 cup freshly brewed coffee
  1. In bowl of stand mixer, combine dry ingredients.
  2. Add buttermilk, oil, eggs and vanilla slowly until just combined
  3. Slowly add coffee until just combined.  Remove bowl from mixer and fold to make sure all in incorporated.
  4. Scoop into regular cupcake pan. I use a standard icecream scoop to make all the cupcakes the same size.
  5. Bake at 350 for about 20 minutes.  Let cool 15 minutes before removing to cool  completely.

Salted Caramel Icing

  • 1 cup softened unsalted butter
  • 1 8oz package softened cream cheese
  • 1/2 cup salted caramel sauce (I use Trader Joes)
  • 6 cups confectioners sugar
  • 1 tsp vanilla
  1. In bowl of stand mixer, cream butter and cream cheese.
  2. Add the caramel sauce and vanilla until combined
  3. Mix in the 6 cups of sugar until the icing stands up on it’s own.  The thing with using cream cheese, the icing is a lot softer than traditional butter cream.

Putting it together!

  1. Fit a piping bag with a large star tip (1M).
  2. Starting in the centre, pipe circles outward to create a rosette.
  3. Drizzle more salted caramel sauce over the icing.
  4. Sprinkle with Fleur-de-Sel and chocolate curls.

Next up in the Fresh Strawberry Cupcakes.  I use actual fresh strawberries but add a small package of strawberry jello powder to really enhance the flavour.  I got this idea from Sweetapolita.  I also used fresh strawberry puree in the buttercream as well.

strawberrycupcake

Fresh Strawberry Cake:

  • 1-3/4 cups granulated sugar
  • 1 (85 g) package strawberry flavored Jell-O
  • 1 cup unsalted butter, softened
  • 4 eggs (room temperature)
  • 3 cups unbleached flour
  • 1 tablespoon baking powder
  • 3/4 teaspoon salt
  • 1 cup whole milk, room temperature
  • 1 tablespoon pure vanilla extract
  • 1/4 cup strawberry puree
  1. To make the puree, remove 1 cup of frozen strawberries and add to a blender.  Let them sit out for about 5 minutes.  Add 2 tbsp of apple juice and blend until no big frozen chunks are left.  Put aside.
  2. In the bowl of a stand mixer, cream the butter, sugar and jell-o until fluffy.
  3. Add eggs until combined.
  4. In one separate bowl, combine milk, vanilla and strawberry puree.
  5. In another bowl, combine the flour, baking powder and salt.
  6. Alternate adding each bowl contents to butter mixture.  Starting and finishing with dry ingredients.
  7. Scoop into prepared cupcake pan.
  8. Bake at 350 for 20 minutes.  Let cool.

Fresh Strawberry Icing

  • 1/2 cup unsalted butter softened
  • 1/2 cup Crisco shortening
  • 1 tbsp milk
  • 1 tsp vanilla
  • 4-6 tbsps strawberry puree
  • 4 cups confectioners sugar
  1. In the bowl of a stand mixer, cream the butter and Crisco until combined.
  2. Add the 4 cups confectioners sugar
  3. Add the milk, vanilla and strawberry puree.  Whip until nice and fluffy but holds it shape.
  4. Pipe onto cupcakes using the 1M Wilton star tip. This time start at the outside and circle to center.
  5. I made small fondant strawberries and added them to each cupcake for a little accent.

Each of these recipes makes two dozen cupcakes.  I only needed three dozen total, so the last dozen I froze and will use when I need a quick dessert.

cupcakes

So I hope you don’t hold it against me that I’m not a cupcake lover but I would totally make these again in a heartbeat!

Thanks for looking!

Friday, February 28, 2014

Homemade Chocolate Granola Bars–super easy and delish!

Chocolategranola1

I’m back, sorry.  Super busy here at the homestead but I do have a little something to share.  Now I made these a few weeks ago and they were just delicious.  I gave a few to a friend down the street and she said these were the best she’s ever had, so there you go!

I love granola bars but know that deep down they ask like they are good for you but really they aren’t.  I decided to make my own.  I tried to cut the sugar and oil and keep them yummy.

Recipe:

  • 2 cups oats
  • 1 cup sliced almonds
  • 1 cup coconut
  • 1/2 cup walnuts
  • 3 tbsp unsalted butter melted
  • 3/4 cup honey
  • 1/4 cup brown sugar
  • 1 tsp vanilla bean paste
  • 1/4 tsp salt
  • 1 cup dark chocolate chips
  1. Preheat oven to 350 degrees
  2. Place oats, almonds and coconut on ungreased sheet pan and bake until golden brown.  About 10 minutes.  Set aside in large mixing bowl.
  3. In medium sauce pan, melt butter and mix in honey, sugar, vanilla and salt.  When sugar is dissolved, pour over oats mix.
  4. Once all coated add the chocolate chips.  Don’t freak out when they melt, that’s the trick!
  5. Pour the mixture onto a sheet pan that’s been covered in foil and sprayed with cooking spray.  Makes it very tricky to get out if you don’t.  Press down to get it flat.
  6. Bake for 25-30 minutes.  Remove and let cool before cutting.
  7. Keep in air tight container for up to two weeks.  In my opinion they get better with age :)
  8. Enjoy!

photo 1

So there you have it, super easy and super tasty.  I may have eaten them all because I used really dark chocolate and the girls prefer milk chocolate.  It might have been intentionally, hehe.  Also, each slice was less than 100 calories :)

granolabar

I have some cookies and cakes to share but want to make sure the intended see them first.  Have a great weekend!

Thanks for looking!

Monday, January 27, 2014

January is for birthday!

fancypicwithlogo

At least for me!  My birthday is tomorrow and oh yes there will be cake.  But you’ll have to come back to find out what I whip up.

I also know of 15 others born in this great month plus my Rowan’s birthday is February 1st, so lots of cakes to be done.  No I don’t make them all, just for a select few.  I also had the opportunity of making a cake this year for a new friend, Mark.  Mark is the owner of Mark Day Company, Caterer.  He emailed me before Christmas to ask if I would make some cookies for the holiday rush and I said sure!  Then he went through my portfolio on Flickr and saw a cake in my feed plus some day of the dead cookies and asked if I would make them for his birthday. UMMMMM…OK.

It also happened to be on the same weekend as our next door neighbour’s son’s birthday and I usually do his cake too.  I don’t do a lot of cakes and two in one week is certainly extraordinary but what the heck.

I started by making some cookies and by some I mean one hundred Day of the Dead cookies.  Now when Mark went through my Flickr he ordered based on this picture.  I’m embarrassed now but at the time I made them three years ago I was uber proud.  The picture is bloody aweful too.

IMGP8222

I told his that they were a while ago and my piping on cookies was definitely at a different caliber now, so I could probably make them nicer.  So I made him these…actually 100 of these. And yes my hand did cramp.

Day of the Dead

The cake he wanted was a replica of the cake I did at a course I did at Swank Cake Design here in Raleigh.  It’s been two years but sure I can do that, at least I hope I can :)  But man I have to make a flower too and I haven’t done one of those in over 5 years, especially one on a wire.  I guess I better practice and so I did.

flower

It turned out better than I expected on the first go, it ended up being the one I used.  That was a good sign. I then made the recommended gumpaste from scratch and practiced on the applique cutters and they seemed to work, so I decided I was ready.  After the cookies were complete, I moved on to the cake.  The cake was a dark chocolate sponge with fudge buttercream filling and coated with chocolate ganache.  I really like working with ganache, it smooths so beautifully. 

ganachea

Add a fondant coat and it’s ready for the applique and voila…looked pretty good.  The words are an inside joke, I think :)

fancypicwithlogo

Now Mark also wanted some simple rosette cupcakes for which I forgot to take a picture, so lets use our imaginations, shall we.  They were vanilla bean cupcakes with a simple syrup and a vanilla bean buttercream peach rosette on top.

I dropped them all off in the swanky location, got to finally meet Mark and then I was off back into the kitchen to make cake number two!  This one was slightly less stressfull.  Tyler turned four and he wanted cookies but his mum wanted cake, so I combined the two.  He’s also all about the movie Cars and Cars 2, so I made some cookies.  I made all the big names and added Guido “pit-stop” because he’s my favourite.  Sorry about the bad picture, I forgot to take a good one.

cookiesa

Then I used the same vanilla bean cake as in the cupcakes and made a simple 8” cake covered in buttercream.  I tried the Viva towel method for smoothing and for the first time it worked.  I added the cookies and now cake two was done and I can take a very short break.

carscaketyler

guidocloseup

This week I’m making my cake and my daughter’s 6th birthday cake.  You’ll have to wait until next week to see what I made us :)

Thanks Mark for taking a chance on me for your birthday party and as always Tyler, I love making you smile!

Thanks for looking!

Recipes used this week:

Find me on Facebook, Twitter, Instagram, Flickr and Pinterest

Follow my blog with Bloglovin

Monday, July 22, 2013

Happy Birthday Rob!

Today is my awesome husband’s birthday!  Yesterday we had a fun bbq with friends and then today we had a small party with just family.

I made him two cakes.

This one for the party:

robminion

It’s a three layer, 6” round chocolate cake with fudge buttercream.  Then I made it into a minion!  He turned out way better than I could have hoped.  Not bad for starting it at 6am before the rest of the house arose for the day.

Today I made him his birthday birthday cake, his favourite:

blackforest

It’s 4” round Black Forest Cake.  Chocolate cake with layers of whipped cream and cherries.

Chocolate Cake (my kids absolute favourite)

  • 1 3/4 cup flour
  • 2 cups sugar
  • 3/4 cup cocoa
  • 2 tsp baking soda
  • 1 tsp baking powder
  • 1 tsp salt
  • 1 cup buttermilk
  • 1/2 cup vegetable oil
  • 2 large eggs
  • 1 tsp vanilla
  • 1 cup freshly brewed coffee
  1. In bowl of stand mixer, combine dry ingredients.
  2. Add buttermilk, oil, eggs and vanilla slowly until just combined.
  3. Slowly add coffee until just combined.  Remove bowl from mixer and fold to make sure all in incorporated.
  4. Divide into 4 6” round pans. (I weigh my bowl and divide by number of pans, subtracting weight of bowl)
  5. Bake at 350 for about 35 minutes.  Let cool 15 minutes before removing to cool completely.
  6. Ice with buttercream.

Chocolate Fudge Buttercream

  • 1 cup softened unsalted butter
  • 1 cup room temperature shortening
  • 7 cups icing sugar
  • 1 cup cocoa
  • 6 tbsp milk
  1. Cream butter and shortening until combined.
  2. Add icing sugar and cocoa.
  3. When combined at tablespoons of milk one at a time until desired consistency.  The thicker the icing the harder to spread.

Cherries (can be used in Black Forest cake as well as cherry pie filling:

  • 1 can tart cherries in water
  • 1 tbsp flour
  • 1 tbsp cornstarch
  • 2 tbsp sugar
  1. Drain cherries and place liquid into small saucepan.
  2. Add sugar and simmer until dissolved.
  3. Add cornstarch and sugar and mix constantly until it starts to thicken.
  4. Put reserved cherries back into juice mixture and combine.  Set aside and let cool.

We also bought him balloons.  This is Rowan on the trip home.

1003160_10153037413010153_774770447_n

In hindsight, 38 balloons in my car might have been pushing it!

I think he had a pretty good day!

Happy Birthday to the best hubby!  Love ya Smile

Thanks for looking!

Thursday, July 18, 2013

Summer Picnic Party–Best Chocolate Mousse EVER!!!

Summerpicnicparty

I love hanging out with friends and today I get to share one of my favourite treats and hang out with some of the best people I know in the blogosphere.

Hani from Hanielas and Beth from Hungry Happenings are hosting a wonderful way for all of us to get together.  A Summer Picnic Party!  Grab your red gingham blanket, your wicker basket and your favourite beverage and join us in the park!

When Hani asked me to take part, I was like, but of course.  Who doesn’t like a picnic!

Now what to bring???? I know … The Best Chocolate Mousse EVER!!!

picnicmousse1

I know, that’s a bold statement but I stand firm and will challenge anyone.  I don’t make it very often as I would eat the entire bowl.  Normally I serve it in ramekins but that’s not very travel worthy, so I choose the new in thing.  Mason jars! Also because the new “retro” blue jars and fabulous.

So here we go, it’s so easy:

  • 1 1/2 cups heavy/whipping cream
  • 6 oz semisweet chocolate ( I like darker more than milk, but that’s up to you.  It’s also not as sweet)
  • 3 egg whites
  • 1 tbsp sugar
  1. Place the chocolate in the bowl of a double boiler and let melt.  Put aside.
  2. Whip the whipping cream until nicely whipped.  Be careful it’ll turn to butter pretty fast if you use your high setting.
  3. In a separate bowl, whip the egg whites on high until they become a soft peak.  Slowly add the sugar and beat until the eggs become stiff but not dry.
  4. Fold in 1/4 of the whipped cream into the chocolate.  Add the whipped eggs and once they are incorporated fold in the remaining whip cream.
  5. Pour into the mason jars or ramekins and put into fridge for at least a couple hours.
  6. Pop the tops and enjoy!

picnicmousseclose

So I use my Kitchenaid mixer for the whipping cream and use my hand blender for the egg whites.  That way they are complete at about the same time.  From start to finish (into the fridge) is about 20 minutes.

I kid you not, this is the best chocolate mousse EVER.  I had to hide it from my husband and kids so I could let it set up and then take pictures.  I made a small ramekin for Rob because I’m just that nice Smile.  The spoonful in the pictures immediately went into the mouth of Abby with constant requests for more, but I felt at 9am it was a bit early for chocolate mousse.  I also had to give a scoop to Rowan too!

picnicmousse

I hope you enjoyed your visit and now you need to head around the picnic block!  Lots to see and do and drool over.


Have a great Summer Picnic Day!


The Marshmallow Studio - Buzzy Bee Pop Tutorial
Sam's Kitchen - Elderflower Cordial
Lila Loa - Sandwich Picnic Cookies
Pink Little Cake -Shortbread Cookie Tart with Caramel Bits
Hungry Happenings - Ketchup and Mustard Push up Pops
The Partiologist - Ant on a Log
Kitchen Fun with My 3 Sons - Picnic Blanket Treats
The Baked Equation - Lemon Cookie Cake
The Decorated Cookie - Cookies on the String
Not Your Momma's Cookie - Ant Attack Cupcakes


GiveawayPicnicBlogPartyr

GIVEAWAY SPONSORS
Thank you to all the amazing Giveaway Sponsors. Be sure to check out their websites below.
The Marshmallow Studio
Restaurant Ware
The Cookie Cutter Company
 Wilton
 Mary Had a Little Party
 King Arthur Flour


To enter giveaway please use the Rafflecopter below. Giveaway will run from July 20th, 2013 till July 27th, 2013. 6 Winners will be picked using the Rafflecopter widget. Prizes will be picked in the order of sponsors you see above, starting with The Marshmallow Studio and ending with King Arthur Flour. Winners will receive one email from hanielas@yahoo.com. Winners will  have 48 hours to respond. New winner(s) will be picked if we don't hear from you. Thank you and good luck.


a Rafflecopter giveaway