Showing posts with label fondant. Show all posts

Monday, September 15, 2014

Guitar Cake–How I did it!

guitarcake1

This past weekend was our friends, Gary and Olivia’s wedding.  They asked if I would make some cookies and a cake for the rehearsal dinner and of course I said yes, it would be my honour.  Gary didn’t want anything grooms-y but Olivia had a different idea.  She emailed me without Gary knowing and asked it I would make a guitar cake.  I’ve never done a sculpted cake before; so the challenge was thrown.  I went to Google and searched guitar cakes and most of them were great, however, very few were lifelike or life size.  Then whilst on Facebook one day, I saw a post by Jessicakesblog.com about a blog she did on how she made a stand up electric guitar.  I didn’t follow her directions completely, since I was going acoustic, but it did use a lot of her tips and loved that she went realistic.

This is the first sculpted cake I’ve ever made but to be honest, it was pretty simple in the carving department.  It was all the finicky details and making the fondant cover the cake right that made my heart beat a little faster.

guitar

So I started with getting an acoustic guitar template off the internet.  I then used my KopyKake lying on it’s side and projected the template onto the MDF board against the wall.  I played with it a lot to get it to look life size.  Then I just outlined the guitar. 

This is where my hubby stepped in with his mad carpentry skills.  He cut out the guitar body and neck separately.  It couldn’t be one piece since it wouldn’t fit in the fridge, so I made it two pieces.  Then he cut out the thicker board for the base, pieced together the angled piece that connects the neck to the body and then some final pieces to help elevate the guitar so it looks like it’s floating.  He edged everything to make it look polished and then spray painted it all dark brown.

structure

Back in the kitchen, I baked to half sheet cakes and popped them into the freezer.  I covered both the body and neck pieces with aluminum foil.  As per Jessica’s advice, I used two sided take to put it in place. I then took the body board and traced it out on parchment and cut it out a 1/2 inch smaller.  Then I placed it on to the partially frozen cakes and cut them out.

photo 1

IMG_3862

The one thing Jessica emphatically stated was that chocolate ganache was the way to go, so that’s where I went.  Five pounds of it actually ;)  Once all was ganached, into the fridge overnight.  It weighed a ton, ok may 10lbs with the board, cake and ganache.

IMG_3873

Next up was to cover in fondant. After procrasti-cleaning the downstairs, I rolled out a huge piece of white fondant.  Then I prayed to the fondant gods and onto the cake it went.  To my absolute amazement, it went on beautifully.  Yay me :)  I put it back into the fridge so it would completely firm up.

IMG_3893

I had planned to just airbrush the colour on but instead decided to paint the wood grain onto the top of the guitar body.  I used Americolor chocolate brown and Americolor Yellow with vodka.  I had to play with how much of each before I got the right colour.  I used an extra piece of rolled out fondant and brushed each try until I got it right.  I also used a wide brush which I think really helped give it that wood grain look.

IMG_3896

When the top was painted I just used the chocolate brown with vodka and painted the sides.  It didn’t come out dark enough so I pulled out the airbrush and redid the sides with the Americolor airbrush brown.  It was starting to look like a guitar.

I then moved on to the neck of the guitar.  I didn’t want to use cake, so I made Rice Krispie Treats (RKT) and cut them into the shape of the neck.  I covered with chocolate ganached and then covered with dark brown fondant (which I coloured myself).  I also airbrushed it with the dark brown to match the guitar body.  Once finished I thought I should see if it all fit together.  Initially I didn’t think it did, but then I just pushed it a bit and it fit perfectly.

IMG_3899

Now for the details.  I used the dark brown fondant and made the large circle and small piece where the strings attach and airbrushed them black.  All of the neck pieces are edible as well.  I used my new clay extruder to make all the note marks and the strings.  I love this new toy so much because I no longer have to hurt my hands to create strings or boarders anymore since it has a crank handle.  Genius. 
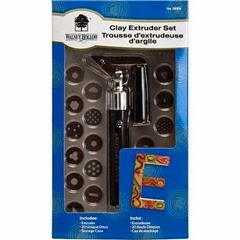
clayextruder

The note marks and string holders are grey fondant painted with silver luster dust and vodka, and the strings themselves are ivory coloured fondant.  I used spaghetti to attach the pieces to the neck head.  I also added “bumper stickers” of all the places Gary has lived as well as his love for the Oregan State Beavers.

IMG_3906

The last thing added was the small plaque we had engraved with Gary and Olivia’s names and wedding date.  I attached it to the board with fondant so they could pop it off and have it as a keep sake.

IMG_3919

So there you go.  That’s how I made it.

This is what it looked like to travel the hour and half away.

IMG_3922

And this is the guitar at the rehearsal dinner.

guitarcake

I had a ton of fun making this cake despite the stress of it being my first carved cake.  Everyone loved it and as you can tell by this next picture, it tasted pretty good too.  Even the RKT neck got eaten :)

IMG_3933

On to the next cake…actually cookies :)

Thanks for looking!

Tuesday, September 9, 2014

Shoes and Bowtie Buttercream Cake–Tutorials included.

shoesandbowtiescake

My friend Mark asked if I would make a birthday cake for two and make it girly.  The other requirement was chocolate and that yellow be incorporated.  Okey dokey. 

I wanted to try the large bow that crushed my spirit after the last cake I made (it broke when I put it on the cake).  This time I used Lesley’s of Royal Bakery’s tutorial on how she makes her bows and victory!  It didn’t break and looks actually like a bow.  Yay me!

I also tried Laura’s of Krazy Kool Cakes tried and true how to get the buttercream flat and crisp edges.  I’m 90% there and feeling groovy.

I would recommend both theses tutorials. They are fabulous.

shoesandbowtiescakecloseup

shoesandbowtiescaketopper

shoesandbowtiescaketoptier

Finally I made those tiny shoes out of fondant.  I used Cakes by Lynz’s how to make mini gumpaste shoes.  You can find it here.  The template is available in Lynsey’s tutorial.

I hope these tutorials help in your attempts in the world of cakes and I hope you enjoyed my creation!

Thanks for looking!

Friday, September 5, 2014

Recent Cakes II

For this second installment of cakes, I made these for the caterer I help out occasionally.

This applique cake I made for the owner’s own birthday.

fancypicwithlogo

I made this Lady Gaga Pop Art cake for a staff’s birthday.

popartcake

These two cakes were made for a charity event.

beautybuscakes

I gotta say, this one tormented me and I’m still not sure about it.  It’s suppose to be a Sombrero Hat cake.

sombrerohatcake

These two buttercream flower beauties were made for Mark’s mom’s 85th.

buttercreamflowers

And this was my most recent.  I’m still not 100% buttercream smooth, but I’m getting there.  And then topped it with a few sugar flowers.

                        jessicacaketopofcakeflowers

So there you have it, my cakes!

Thanks for looking

Tuesday, February 4, 2014

Happy Birthday to Me and My Rowan!!!

The joke in our house is that I gave Rob and I children for our birthdays.  Abby is 6 days after Rob’s birthday in July and Rowan is 4 days after mine.  I’m January 28th and Rowan is February the first!  So as you can imagine lots of cake goes down at our house at least two times a year :)

My birthday is pretty standard.  Dinner with the family and then carrot cake (recipe below too)  I get to play with ideas I’ve not yet tried.  This year I decided I wanted to try the buttercream rosette cake.  Now the only issue is that I prefer my carrot cake naked, however there are others in my house who prefer icing.  This seemed like an appropriate compromise.

cakecollage

I didn’t get to rest on my laurels for very long because next up was Rowan’s Lavagirl cake.  First off, I hate making characters on cookies and figurines out of gumpaste.  Less so of the latter.   But when this face asks, you say yes.

IMG_2217

Now she did give me free reign on the design but it had to look like lava; there had to be a volcano; Lavagirl had to be on it and oh yes, flowers, lots of flowers.  Right!

adventures_of_shark_boy_and_lava_girl_in_three_d_xlg

For those of you who haven’t had the pleasure of Sharkboy and Lavagirl this is the movie poster.  And yes, that is Taylor Lautner of Twilight fame.  His acting was just as bad.  But she loves it and that’s really all that matters.

First I had to make the cake look like lava.  So I used red food colouring in the cake to give it a lava look.  Filled it with chocolate butercream and covered it in marbled fondant.  So far so good.

lavacakecollage

Then I made the volcano out of rice krispie treats and covered it in black and red marbled fondant.  Then I placed it on top, added some lava fondant beads, some flowers and of course Lavagirl herself.  As requested!

lavagirlcollage

I have to admit I was pretty proud of my first hibiscus.  It may not be a traditional colour, but it worked!

My Lavagirl had a great little party at Monkey Joe’s with her friends.  The bounced for an hour, ate pizza and cake and then back to bouncing.  Tired kids are happy kids or maybe that’s happy mommies.

IMG_2208

Now I normally make cookies for goodie bags but this year I was fortunate that my friend Laurie of Cookie Bliss made them.  We got Rowan a logo for her birthday, as she wants to own her own restaurant when she’s grown up. Rowan’s Food Never Fails. 

Basic RGB

I sent it to Laurie and these are the cookies she came up with.  They are brilliant!

IMG_2154

We have several left and I can’t bring myself to eat them as they are so awesome.  Don’t worry, Rowan doesn’t have such an issue.  A cookie is a cookie, especially when it’s a really tasty cookie :)

lavagirlcake

Now I can rest until July for the next set of birthday cakes in this family.  I’d also like to take a moment to thank everyone who wished Rowan and I a happy birthday on my Facebook page.  The love was overwhelming.

Thanks for looking!

Carrot Cake Recipe:

  • 4 eggs
  • 1 1/4 cups apple sauce
  • 2 cups white sugar
  • 2 teaspoons vanilla extract
  • 2 cups all-purpose flour
  • 2 teaspoons baking soda
  • 2 teaspoons baking powder
  • 1/2 teaspoon salt
  • 2 teaspoons ground cinnamon
  • 3 cups grated carrots
  1. Preheat oven to 350 degrees F
  2. In a large bowl, beat together eggs, apple sauce, white sugar and 2 teaspoons vanilla. Mix in flour, baking soda, baking powder, salt and cinnamon. Stir in carrots. 
  3. Pour into prepared pan.
  4. Bake in the preheated oven for 40 to 50 minutes, or until a toothpick inserted into the center of the cake comes out clean. Let cool in pan for 10 minutes, then turn out onto a wire rack and cool completely.
  5. Ice cake with favourite icing.  I used lemon buttercream.
  6. Enjoy!

Monday, January 27, 2014

January is for birthday!

fancypicwithlogo

At least for me!  My birthday is tomorrow and oh yes there will be cake.  But you’ll have to come back to find out what I whip up.

I also know of 15 others born in this great month plus my Rowan’s birthday is February 1st, so lots of cakes to be done.  No I don’t make them all, just for a select few.  I also had the opportunity of making a cake this year for a new friend, Mark.  Mark is the owner of Mark Day Company, Caterer.  He emailed me before Christmas to ask if I would make some cookies for the holiday rush and I said sure!  Then he went through my portfolio on Flickr and saw a cake in my feed plus some day of the dead cookies and asked if I would make them for his birthday. UMMMMM…OK.

It also happened to be on the same weekend as our next door neighbour’s son’s birthday and I usually do his cake too.  I don’t do a lot of cakes and two in one week is certainly extraordinary but what the heck.

I started by making some cookies and by some I mean one hundred Day of the Dead cookies.  Now when Mark went through my Flickr he ordered based on this picture.  I’m embarrassed now but at the time I made them three years ago I was uber proud.  The picture is bloody aweful too.

IMGP8222

I told his that they were a while ago and my piping on cookies was definitely at a different caliber now, so I could probably make them nicer.  So I made him these…actually 100 of these. And yes my hand did cramp.

Day of the Dead

The cake he wanted was a replica of the cake I did at a course I did at Swank Cake Design here in Raleigh.  It’s been two years but sure I can do that, at least I hope I can :)  But man I have to make a flower too and I haven’t done one of those in over 5 years, especially one on a wire.  I guess I better practice and so I did.

flower

It turned out better than I expected on the first go, it ended up being the one I used.  That was a good sign. I then made the recommended gumpaste from scratch and practiced on the applique cutters and they seemed to work, so I decided I was ready.  After the cookies were complete, I moved on to the cake.  The cake was a dark chocolate sponge with fudge buttercream filling and coated with chocolate ganache.  I really like working with ganache, it smooths so beautifully. 

ganachea

Add a fondant coat and it’s ready for the applique and voila…looked pretty good.  The words are an inside joke, I think :)

fancypicwithlogo

Now Mark also wanted some simple rosette cupcakes for which I forgot to take a picture, so lets use our imaginations, shall we.  They were vanilla bean cupcakes with a simple syrup and a vanilla bean buttercream peach rosette on top.

I dropped them all off in the swanky location, got to finally meet Mark and then I was off back into the kitchen to make cake number two!  This one was slightly less stressfull.  Tyler turned four and he wanted cookies but his mum wanted cake, so I combined the two.  He’s also all about the movie Cars and Cars 2, so I made some cookies.  I made all the big names and added Guido “pit-stop” because he’s my favourite.  Sorry about the bad picture, I forgot to take a good one.

cookiesa

Then I used the same vanilla bean cake as in the cupcakes and made a simple 8” cake covered in buttercream.  I tried the Viva towel method for smoothing and for the first time it worked.  I added the cookies and now cake two was done and I can take a very short break.

carscaketyler

guidocloseup

This week I’m making my cake and my daughter’s 6th birthday cake.  You’ll have to wait until next week to see what I made us :)

Thanks Mark for taking a chance on me for your birthday party and as always Tyler, I love making you smile!

Thanks for looking!

Recipes used this week:

Find me on Facebook, Twitter, Instagram, Flickr and Pinterest

Follow my blog with Bloglovin

Monday, July 22, 2013

Happy Birthday Rob!

Today is my awesome husband’s birthday!  Yesterday we had a fun bbq with friends and then today we had a small party with just family.

I made him two cakes.

This one for the party:

robminion

It’s a three layer, 6” round chocolate cake with fudge buttercream.  Then I made it into a minion!  He turned out way better than I could have hoped.  Not bad for starting it at 6am before the rest of the house arose for the day.

Today I made him his birthday birthday cake, his favourite:

blackforest

It’s 4” round Black Forest Cake.  Chocolate cake with layers of whipped cream and cherries.

Chocolate Cake (my kids absolute favourite)

  • 1 3/4 cup flour
  • 2 cups sugar
  • 3/4 cup cocoa
  • 2 tsp baking soda
  • 1 tsp baking powder
  • 1 tsp salt
  • 1 cup buttermilk
  • 1/2 cup vegetable oil
  • 2 large eggs
  • 1 tsp vanilla
  • 1 cup freshly brewed coffee
  1. In bowl of stand mixer, combine dry ingredients.
  2. Add buttermilk, oil, eggs and vanilla slowly until just combined.
  3. Slowly add coffee until just combined.  Remove bowl from mixer and fold to make sure all in incorporated.
  4. Divide into 4 6” round pans. (I weigh my bowl and divide by number of pans, subtracting weight of bowl)
  5. Bake at 350 for about 35 minutes.  Let cool 15 minutes before removing to cool completely.
  6. Ice with buttercream.

Chocolate Fudge Buttercream

  • 1 cup softened unsalted butter
  • 1 cup room temperature shortening
  • 7 cups icing sugar
  • 1 cup cocoa
  • 6 tbsp milk
  1. Cream butter and shortening until combined.
  2. Add icing sugar and cocoa.
  3. When combined at tablespoons of milk one at a time until desired consistency.  The thicker the icing the harder to spread.

Cherries (can be used in Black Forest cake as well as cherry pie filling:

  • 1 can tart cherries in water
  • 1 tbsp flour
  • 1 tbsp cornstarch
  • 2 tbsp sugar
  1. Drain cherries and place liquid into small saucepan.
  2. Add sugar and simmer until dissolved.
  3. Add cornstarch and sugar and mix constantly until it starts to thicken.
  4. Put reserved cherries back into juice mixture and combine.  Set aside and let cool.

We also bought him balloons.  This is Rowan on the trip home.

1003160_10153037413010153_774770447_n

In hindsight, 38 balloons in my car might have been pushing it!

I think he had a pretty good day!

Happy Birthday to the best hubby!  Love ya Smile

Thanks for looking!

Sunday, January 27, 2013

Happy Birthday January Babies–Me Included!

IMGP1446

Well who would have know that January is a baby boom month?  Not me, I mean I was born in January and until recently didn’t realize who many of the people in my life are born in the first month of the year.  We are not New Years babies, we are Victoria Day/Memorial Day babies. Yup, that’s right, our parents were drinkers :)  LOL  SHHHH don’t say that to my mother, she’d die ;)

Ok, back to why you are here…the cake!

Our friends down the street; Linda and Adam, fellow Jan babies, hosted a party for all us birthday babies.  I offered to make the cake.

There’s nothing really special about the type of cake, I’ve made them several times before.  What’s fun is the new icings I used.  Now I made them and then googled hoping I’d be original, but alas no.  So I’m not giving credit because I honestly didn’t borrow.  I’d like to think of it as great minds!

The bottom cake is a chocolate/yogurt sponge with chocolate Kahlua swiss meringue buttercream and the top layer is my favourite carrot cake with a champagne vanilla bean cream cheese icing.  I asked on my FB which flavours I should use for the icing and these are the ones that won.  Don’t worry, I’ll include all four recipes below.

The theme of the party was winter wonderland.  And considering our recent snow and ice “storms”, it was very apropos.  As a Canadian living in the North Carolina, their version of a snow storm is a regular daily event in Ottawa, we called it just snow.  HAHA.  So I decorated with snowflakes.

The chocolate cake recipe can be found here.

The carrot cake recipe can be found here.

IMGP1446

Now for the icings!

Chocolate Kahlua Swiss Meringue Buttercream:

  • 5 large egg whites
  • 1 cup plus 2 tablespoons sugar
  • Pinch of salt
  • 1 pound (4 sticks) unsalted butter, cut into tablespoons, room temperature
  • 2 tbsp Kahlua
  • 4 1/2 ounces melted semisweet chocolate

Directions:

  1. Combine egg whites, sugar, and salt in the heatproof bowl of a standing mixer set over a pan of simmering water. Whisk constantly by hand until mixture is warm to the touch and sugar has dissolved
  2. Attach the bowl to the mixer fitted with the whisk attachment. Starting on low and gradually increasing to medium-high speed, whisk until stiff (but not dry) peaks form. Continue mixing until the mixture is fluffy and glossy, and completely cool (test by touching the bottom of the bowl), about 10 minutes.
  3. With mixer on medium-low speed, add the butter a few tablespoons at a time, mixing well after each addition. Once all butter has been added, whisk in Kahlua.
  4. Fold in chocolate
  5. Keep buttercream at room temperature if using the same day.  It makes about 5 cups.

Champagne and Vanilla Bean Cream Cheese Icing:

  • 8 oz  cream cheese at room temperature
  • 1/2 cup (1 stick) unsalted butter softened
  • 1/4 cup champagne
  • 1 tsp vanilla bean paste
  • 4 cups icing (confectioners) sugar
  1. Combine cheese, butter, champagne and vanilla together.
  2. Add icing sugar 1 cup at a time.  If required add  more or sugar depending on consistency.  You want it a bit stiffer so it’s easier to spread.

And here are the ones that I couldn’t used:

Vanilla Bean Swiss Meringue Buttercream:

  • Use the SMB recipe above but omit chocolate and kahlua and add 1 tbsp vanilla bean paste.

Amaretto Swiss Meringue Buttercream:

  • Use the SMB recipe above but omit chocolate and replace Kahlua with Amaretto.

So for all you January babies, I hope you had a wonderful birthday and I hope someone special made you a cake! Just forward this post as a hint :)

IMGP1446

Here’s to all my friends and family who share this month with me:

Christine R, Kim, Mary-Anne, Miles, Jen L, Tracie, Nancy N., Connie, Coreen, Jennifer B, Susan, Christina B, Karina, Patty, Angela, Sarah, Emily, Kristine, Julie, Retah, Samantha, Deanna, Dee, Linda A, Tyler, Adam, Kaye, Rob T, Tiffany, Keira, Satomi, Angie.

Thanks for looking!